I'm so excited. I now have a new look for my blog. It has a new banner and background all designed by me. I also have my very own button, designed by me, that can be shared on other sites. Check it out.
If you would like to share my button, please just grab the code for it below my "about me section" on the right. Please let me know if you do, because I would love to check out your site too. Thanks.
Sunday, January 9, 2011
Monster Horns
Today, I would like to share how to make some awesome monster horns to wear.
I got the idea from the Renaissance Festival, I like to attend every year. At the festival, a few years ago, I had bought some horns for my daughter to wear. Unfortunately, she had lost them. Instead of going back out and buying another expensive pair, I thought I could make some myself.
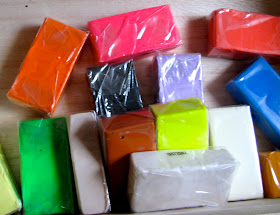
 To make some, you need to first pick out the color of polymer clay (I used sculpey) you would like to use. You will need at least a half a package of the polymer clay. You will need more if you want to make bigger horns. The sculpey pictured here are the 1/2 size packs.
Divide the sculpey in half and work it into cylinder-like shapes.
Pinch the tops and mold it to a cone shape.
Take a wooden dowel (a pencil could work) and punch holes through them all the way as shown in the picture. Bake the polymer clay according to package directions.
Cut a piece of ribbon that could be tied around your head and then some.
Thread the ribbon through the holes and make knots on both sides of the horn.
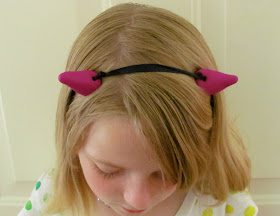
Make sure when you are placing your horns on the ribbon, that you place them apart enough, so that they will sit nicely on your head. Tie the horns onto your head with the tie part going behind the head and enjoy.
I got the idea from the Renaissance Festival, I like to attend every year. At the festival, a few years ago, I had bought some horns for my daughter to wear. Unfortunately, she had lost them. Instead of going back out and buying another expensive pair, I thought I could make some myself.
 To make some, you need to first pick out the color of polymer clay (I used sculpey) you would like to use. You will need at least a half a package of the polymer clay. You will need more if you want to make bigger horns. The sculpey pictured here are the 1/2 size packs.
Divide the sculpey in half and work it into cylinder-like shapes.
Pinch the tops and mold it to a cone shape.
Take a wooden dowel (a pencil could work) and punch holes through them all the way as shown in the picture. Bake the polymer clay according to package directions.
Cut a piece of ribbon that could be tied around your head and then some.
Thread the ribbon through the holes and make knots on both sides of the horn.
Make sure when you are placing your horns on the ribbon, that you place them apart enough, so that they will sit nicely on your head. Tie the horns onto your head with the tie part going behind the head and enjoy.
Friday, January 7, 2011
Peace Bag
Today, I wanted to share a picture of a peace sign bag I made for one of my daughter's friend's birthday. I really loved the way it turned out. I have plans on making one for my daughter and one for me too. Also, the hat that my daughter is wearing was made by my friend Tara. She is very talented and makes some of the coolest stuff. You can check out her store here.


