Wednesday, March 30, 2011

Juice Pouch Wallet How-to

Today, I am going to share with you how to make a juice pouch mini wallet.

I wasn't the one that came up with the idea, but this is just how I did it. I have been seeing these little coin pouches online and at craft shows and decided that I wanted to try to make one. I also want to apology for the quality of these pictures. I took these pictures right before my old camera died.

Now time for the how-to:

Step 1
Get a empty juice pouch and a zipper. My zipper is much longer then what I need, but it's what I had on hand.

Step 2
Cut/ slice open the bottom of the juice pouch.
You will want to clean the inside and outside of the juice pouch with warm soapy water and dry it. This way you can make sure all the juice is gone and there will be no weird smell to it after you make it. I ended up letting mine dry overnight to make sure it was completely dried.

Step 3
Flatten the juice pouch, if you haven't already. Line up your zipper, so that a little bit of the end hangs off the side. Make sure you are not lining the juice bag up too close to the zipper's teeth.

Step 4
You can unzip the zipper to make it easier to sew on. I used my sewing machine to sew this. It is up to you what stitch you would preferred to use. I did a small zigzag stitch on mine, but have seen them with a straight stitch.
Step 5
With your zipper undone, sew the zipper onto the other side of the juice bag. Make sure when you do this that your zipper will still be lined up with the other side. I used a pin to hold it in place, to help me.

Step 6
Now fold your juice pouch in half and zip your zipper up.
Step 7
Cut off the sides of the zipper. Make sure to leave a little on both sides hanging over the edge of the juice pouch.
Step 8
Tuck in the sides of zipper into the pouch and sew up the sides. You may want to unzip your bag some when sewing up the side with the zipper, just to make it easier.

Step 9
Now your project is done. Sit back and enjoy your new change purse.

Saturday, March 5, 2011

Wish You Were Here, Postcard Contest

At the start of this quarter, in school, my teacher, for my advance photoshop class, wanted us to enter the Detroit AIGA's Wish You Were Here Postcard Contest. We were to either go out and take a picture or use a picture that we have taken in the past, that could represent Michigan. I decided to use a picture that I took of the Ann Scipps Whitcomb Conservatory on Belle Isle just east of downtown Detroit. This is the nation's oldest conservatory. I ended doing some color corrects, and had to boost up the blue in the sky. Living in Michigan it seems like we have a lot more gray skies then we do blue. I submitted my entry weeks ago and almost forgot about it till I received an e-mail about it. I was soo excited when I received that e-mail with my name being on the list of finalists.

Turns out they had over 150 entries and mine made it to the finial round of just 48 submissions. I was the only one in my class to make it in. At this point it is open voting to the public. The 25 entries that have the most votes will be turned into postcards and mailed to AIGA chapters throughout the country. Each person that would like to vote is allowed one vote per day up till March 9th. Please take a moment out of your time and click here to vote for me. Thank you.
Here is the picture I submitted to be used as a postcard

Friday, March 4, 2011

Valentine Zombies

I know it's way after Valentine's day, but I wanted to share this tutorial I made for these little zombie guys. I came up with the idea for these guys for my daughter's valentine's class party. She is a big zombie lover. I was thinking these guys could be great party favors for a birthday party or a Halloween party.


To make these you are going need:
  • Green paper (I used scrapbook paper, but construction paper would work too)
  • White Paper (I just used printer paper)
  • Tape
  • Glue (I used a hot glue gun, but tacky or elmers glue would work too)
  • Foam (precut or you can cut them out yourself)
  • Googly eyes
  • A black or red marker (this is for the scars)
  • A peach or pink marker (this is for the brain)
  • Goodies to put inside, like candy. I put fruit-by-the-foot inside the ones we made
  • A paper cutter or scissors would work too if you don't have one
  • scissors
Step one
 Get your paper cutter or scissors out and cut your paper in half and then cut those pieces in half
You should have a pile that looks something like the picture below.

Step two

Get your tape out and make the paper into tubes like the picture below.

Step three
Get your foam out. I got this cool little pack below from the dollar store.
From this foam you are going to cut out large hearts. These will be the base/ feet for your zombie. You can use one of your tubes you have made, to figure out how big of a heart shape you need.

Step four

Glue the heart base/feet to the bottom of you green tube.
 
Step four
Next glue on your eyes.

Step five
I had some pre-cut heart shape foam pieces that glued on to give the zombies a heart.

Step six
Next take a piece of white paper and rip it in half. You are going to want to really crumpled this paper up. I ended up crumpling the paper and then uncrumpling it and recrumpling it. You want this piece of paper to sit on at the top of the inside of the green tube without it falling down to the bottom. 

Step seven

Get your pink or peach marker out and you are going to want to color all over the top of the brain. It doesn't have to be perfect. In fact leaving white spots make it look more brain like.
Step eight
Next get your red or black marker and give your zombie guy scars.
Now you have a very cool, friendly zombie for your enjoyment. Don't forget you can take out the brain and add goodies, like candy, small toys, or fruit-by-the-foot like I did.

Sunday, January 9, 2011

New look and new button

I'm so excited. I now have a new look for my blog. It has a new banner and background all designed by me. I also have my very own button, designed by me, that can be shared on other sites. Check it out.

If you would like to share my button, please just grab the code for it below my "about me section" on the right. Please let me know if you do, because I would love to check out your site too. Thanks.

Monster Horns

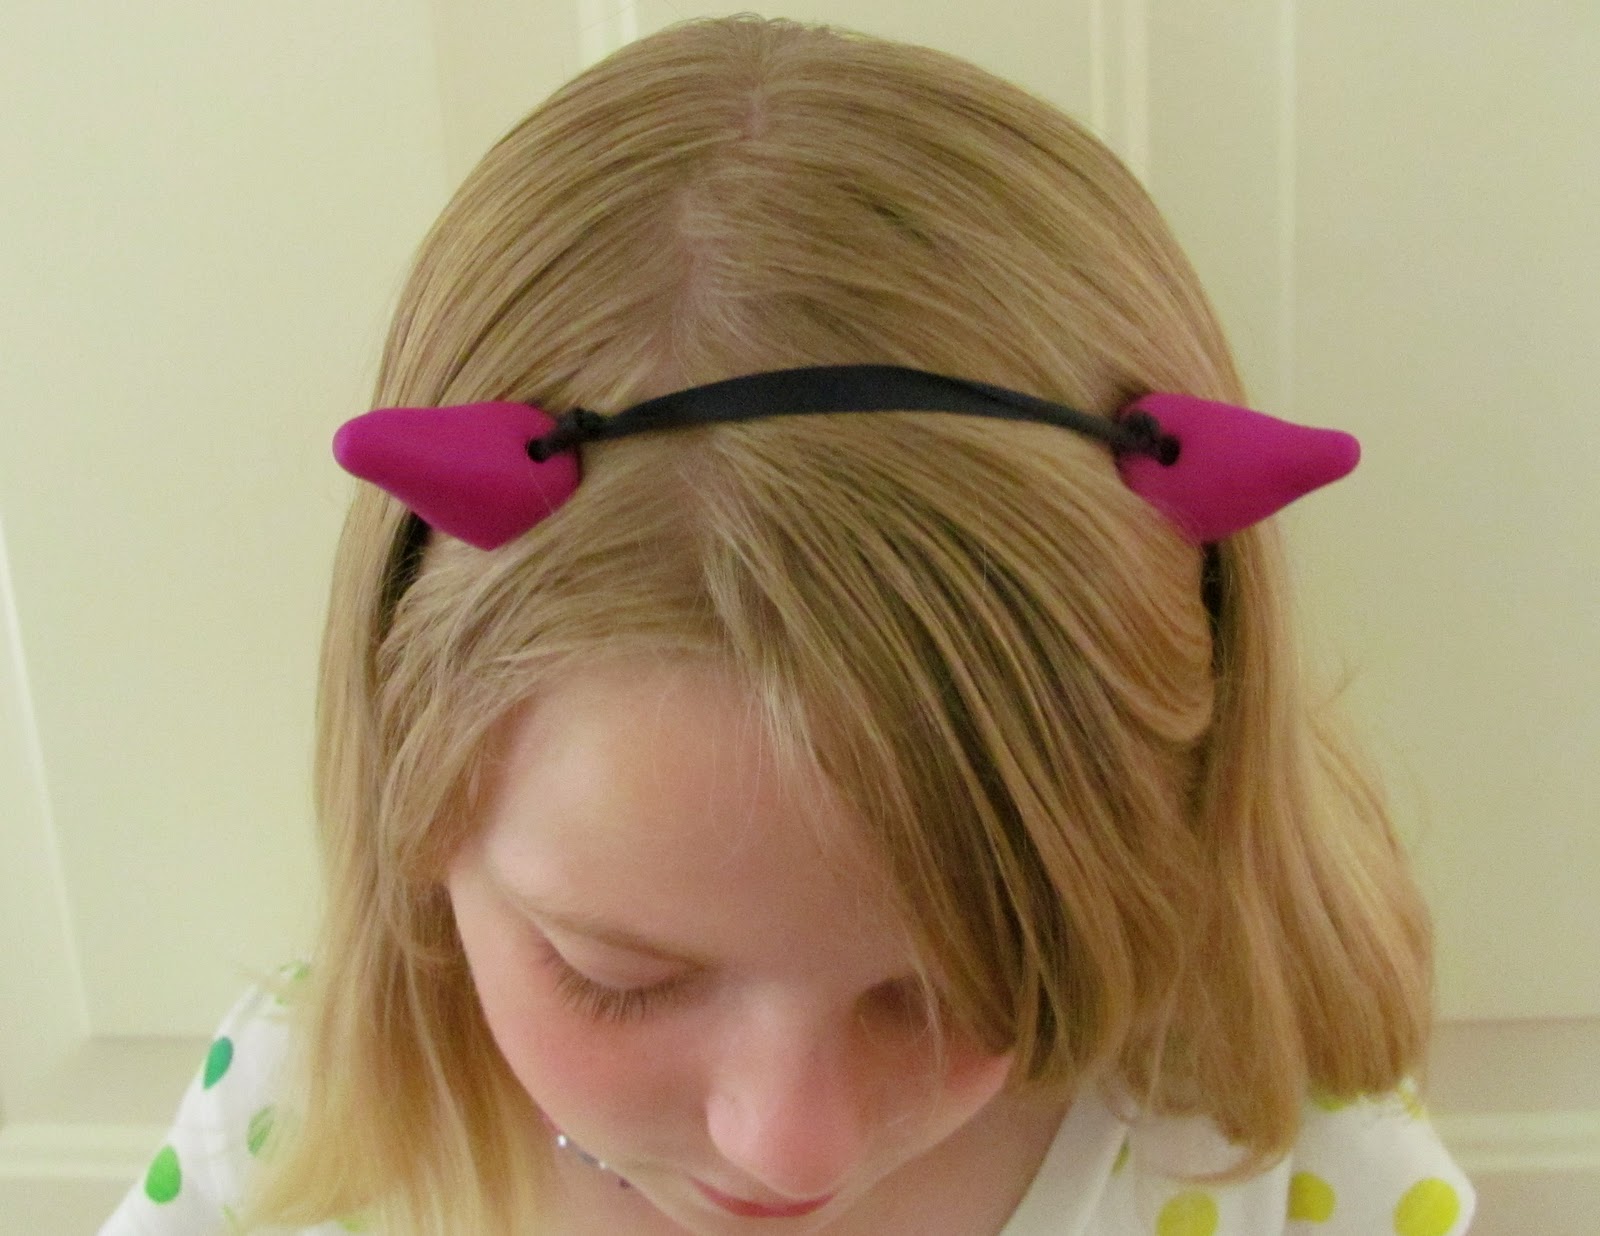
Today, I would like to share how to make some awesome monster horns to wear.
I got the idea from the Renaissance Festival, I like to attend every year. At the festival, a few years ago, I had bought some horns for my daughter to wear. Unfortunately, she had lost them. Instead of going back out and buying another expensive pair, I thought I could make some myself.


To make some, you need to first pick out the color of polymer clay (I used sculpey) you would like to use. You will need at least a half a package of the polymer clay. You will need more if you want to make bigger horns. The sculpey pictured here are the 1/2 size packs.

 Divide the sculpey in half and work it into cylinder-like shapes.

 Pinch the tops and mold it to a cone shape.


Take a wooden dowel (a pencil could work) and punch holes through them all the way as shown in the picture. Bake the polymer clay according to package directions.


Cut a piece of ribbon that could be tied around your head and then some.
Thread the ribbon through the holes and make knots on both sides of the horn.

Make sure when you are placing your horns on the ribbon, that you place them apart enough, so that they will sit nicely on your head. Tie the horns onto your head with the tie part going behind the head and enjoy.

Friday, January 7, 2011

Peace Bag

Today, I wanted to share a picture of a peace sign bag I made for one of my daughter's friend's birthday.  I really loved the way it turned out. I have plans on making one for my daughter and one for me too. Also, the hat that my daughter is wearing was made by my friend Tara. She is very talented and makes some of the coolest stuff. You can check out her store here.


Wednesday, December 29, 2010

A Joyful Holiday Season

This holiday season, I had decided my goal was to make nothing but handmade crafts for Christmas. I am happy to say, I was able to achieve that goal. I would like to share with you some of the items I made and where I got the ideas from.

Can Walkers

Below you can see a picture of my daughter with the can walkers I made her. This was a very cheap and simple gift to make. I had bought two big cans of diced tomatoes at Costco awhile back ago and saved the cans. I took the labels off of the cans and I had my husband drill two holes into the side of each can. I painted each can with array of different color peace signs and then tied some rope onto them. My daughter tells me this was her favorite gift out of everything she got. The idea for these, came from Family Fun.

Monster Hoodie

This was a very fun project to make. I purchased the black hoodie from a local thrift store and used some of the fleece, that I had on hand, to add the eyes and the teeth to the hoodie. The idea for this came from a project posted on CO+K. I really liked the way this hoodie turned out and I'm really tempted to make one just for myself.


Polar Bear Hooded Scarf

My daughter has had a love for polar bears for the last couple of years. Last year we adopted a polar bear in her name. This year I wanted to do something a little different. I have been seeing hooded scarfs everywhere lately and I have been loving them.  I decided to make my daughter a polar bear hooded scarf out of fleece. Luckily for me Urban Treads sent me out an e-mail with a link on their tutorial on how to make a hooded scarf with a down loadable template. Once I had the hood scarf together, I took my sewing machine and did a zigzag stitch on the the edge of all the material, this was to give it an overlock stitch look or to make it look like I used a serger. Once, this part was done, I sewed on the paw prints onto the pockets and sewed on the eyes, nose and ears. In the ears I added a little bit of stuffing to help them stand up.


Wood Burning

I recently tried a new crafting technique, wood burning. It took me many tries to get the hang of it, but I have been enjoying it. I'm hoping I can get good enough at it, so that I can start doing some of the more detail work I have seen out there. I  ended up making some little ornaments for the tree. I ended up making a reindeer, a sun, a tree, and a pine tree as ornaments.


I hope everyone had a great holiday and I'm looking forward to a great new year!