Saturday, February 21, 2015

A free doodle coloring page just for you.

In my last post I talked about how I have been getting into creating doodle art that I turn into coloring pages. These coloring pages I have been selling on Etsy and at craft shows. They have been a hit.

Doodle coloring pages displayed at one of my craft shows

If you want to get your hands on one of my doodle coloring pages for yourself visit my Etsy at https://www.etsy.com/shop/RootsDesign . You can purchase one of my designs as an instant download. This means that after you purchase the design you can get immediate access to the file for printing, so the coloring fun can start right away.

While I've been busy designing all these awesome coloring pages my daughter had a request. She wanted me to create one that had to do with one of her favorite cats, Grumpy Cat. Of course I had to make my daughter wish come true. It ended being a great Christmas present. She decided that she just wanted to have it framed, which is also a great thing to do with these pieces.


I want to pass the enjoyment onto others so I'm giving this print away for free for your amusement.  I would love to see what you do with it or how you color it in.


To get a copy without the watermarks click the links below to download. I have both a jpg and a pdf for easy printing. These are both through Google drive, so you may need a google account to get them, but getting an account is free.

*Please do not re-sell these images. These images are for personal use only.

Get the jpg by clicking here

Get the pdf by clicking here


Wednesday, December 24, 2014

Doodle Prints for Coloring

I've been missing in action for a bit now, but every now and then I would get a message from someone that came across my blog and loved it. These little message were so heart warming for me that I decided I'm going to work on keep up on my blog again.

I've been keeping pretty busy. I suddenly feel like my muse is back. I have so many ideas and just not enough time to get them all out. It really is a great thing. So what have I've been doing lately?

I've gotten really into creating doodle prints also known as zentangle inspired art. I had Thyroid surgery back in September and I wasn't really up to sitting up to do much. So I started to sketch, laying down, with only be a little bit elevated.


From that point I started to just go crazy. I just kept pumping out designs.


Loving the look of my designs I decided to try to sell them as prints. I always loved the black and white look, so I never added color to them. At my craft show I had many people think they were coloring pages and wanted to buy them for that purpose. I never really thought about making coloring pages before, but I loved the idea. Coloring is a great way to de-stress and is a great form of art therapy. (I've been doing my research ) Creating these really is art therapy for me as well. From that point on I have been creating detailed coloring pages that are great for adults and children.


So far I have had a great response to these. I have many more of them planned, so make sure to stay tuned for more designs. I tend to put my designs up on my Facebook or Instagram first. If you would like to get one of my prints for yourself or a loved one, you can visit my Etsy page to purchase a digital download. That means you can start coloring right now. 


Of course I still really like them as print for framing. This one below is my favorite one. 

Saturday, February 15, 2014

Comic Book Mix Media Art


I've been creating comic book mix media art for awhile now. It is one of my favorite and quickest pieces of art to make. The only thing that takes the longest is the drying time. The whole reason why I started making this type of mix media art was because of my hubby. He was my inspiration.

It was his love of superheroes that made me want to create pieces that he would enjoy. It also helped that he gave me his old comic books that were falling apart to use. Today, if I need to use a comic book I always go through him because I want to make sure any comic I used is not a valuable one. 


Thursday, June 6, 2013

Hair Today, Gone Tomorrow

I've been growing my hair out for the last two years, just so I can donate it. Today, I had 10 inches cut off. I love my new hair style. It is so light and fun. I will be donating it to Children with Hair Loss  a place right here in Michigan.


Sunday, January 29, 2012

Comic Book Mix Media Art

There has been this huge stash of comic books, for the last two years, that were just sitting in my attic. When we moved we suddenly didn't have a spot for them. We decided to sell the ones we could and I got to play with the rest. After creating my newspaper art, which you can see it here, I decided I wanted to do something like that with his comic books, but this time I wanted to use paints too. As you can see by the results, they turned out awesome! I ended up making a Batman one, a Superman one, a Spider-man one, a Captain America one, and a Green Lantern one. I'm actually in the progress of making some more right now. I can't seem to get enough of these.

Below please enjoy all the pictures below of my comic book mix media art pieces.


Wednesday, January 18, 2012

Jar of Love

Every time I have asked my grandmother what she wants for her birthday she is always tells me that all she wants is love. So I decided that was what she was getting. I decided I was going to make her a jar of love. I was thinking this would also work perfect as a Valentine gift. Today, I would like to share with you how I made my jar of love.

Materials needed:
  • a clean jar
  • glue
  • printer
  • scissors
  • material (optional)
  • twine (optional)
  • spray paint or paint (optional) 
 1) First get a clean jar. I used an old pasta sauce jar. You really could use any type of jar you want. This is a great way to recycle/ reuse something.

2) For the lid I decided I didn't want the words "Prego" on it, so I covered it up with a silver spray paint.


3) I then printed out the label I made on regular printer paper and the hearts on red and white thicker paper, like card stock. I actually used scrapbooking paper. The hearts all have different love quotes that I found like, "All you need is love."

If you don't feel like you could make the label or hearts by yourself, or if you really love my label and hearts or you just want to make it easy on yourself I do have a pdf download of the label and hearts I am selling in my Etsy store. You can find it HERE.

4) Once I have everything cut out, my next step is to glue on my label. I ended up only putting glue on the back of the label and applying it to the jar.

 5) Next, add your hearts. You will want to stack them in a way so they don't just lay flat in the jar. Then add the lid. You could stop here, but I wanted to give the jar an extra touch. 


6) Take out a piece of fabric and trace a circle on it. I ended using a cereal bowl to help me make the perfect circle. I used pinking shears (the zig zag scissors) to create a neat edge on my fabric circle.

 7) I then took a piece of twine and tied the circle onto the lid of my jar.


Look how happy my grandmother is with her jar of love!

Here are some more views of the jar of love, so you can really see how the hearts look in it.

Sunday, January 8, 2012

DIY A-frame Play Tent

Here is another example of a DIY project idea, I got from Pinterest. If you haven't checked out Pinterest you really need to. There are so many wonderful and creative ideas on there. I could never get enough. When I saw the below picture of a DIY A-frame tent, I knew it was something I had to make for my daughter.
source
It was pretty simple to make. I just followed the directions from the original tent. For the materials we got the wood from Home Depot and the sheet I found at a thrift store. This tent ended up being a gift to my daughter for Christmas. She just loves it! This tent has been great. When my daughter used to try to build blanket forts, my big Maine Coon cat thought it was great fun to jump in the middle of them to see if he could use it as a bed. Needless to say, her blanket forts would never stay up. Now with this tent that cat lays inside it with her.


Archie Comic Book Art


I just wanted to show off my latest art piece, I created. Lately my daughter has been really into the Archie comics. Since we have moved, her walls have been pretty bare so I wanted to make her something special. I created these 4 pieces of art from pages I found in the Archie comics. My daughter wouldn't let me touch any of her comics, so I had to go to the store to buy some more.  I had to get doubles of everything, so she could read them. Once I had modge pod the comic pages onto the canvases, I drew black and white images of Archie, Jughead, Betty, and Veronica on marker paper with a black sharpie. After I had the image all drawn out, I modge pod them also to the canvas. I'm pretty happy with the result and I hope she will enjoy them.

Wednesday, January 4, 2012

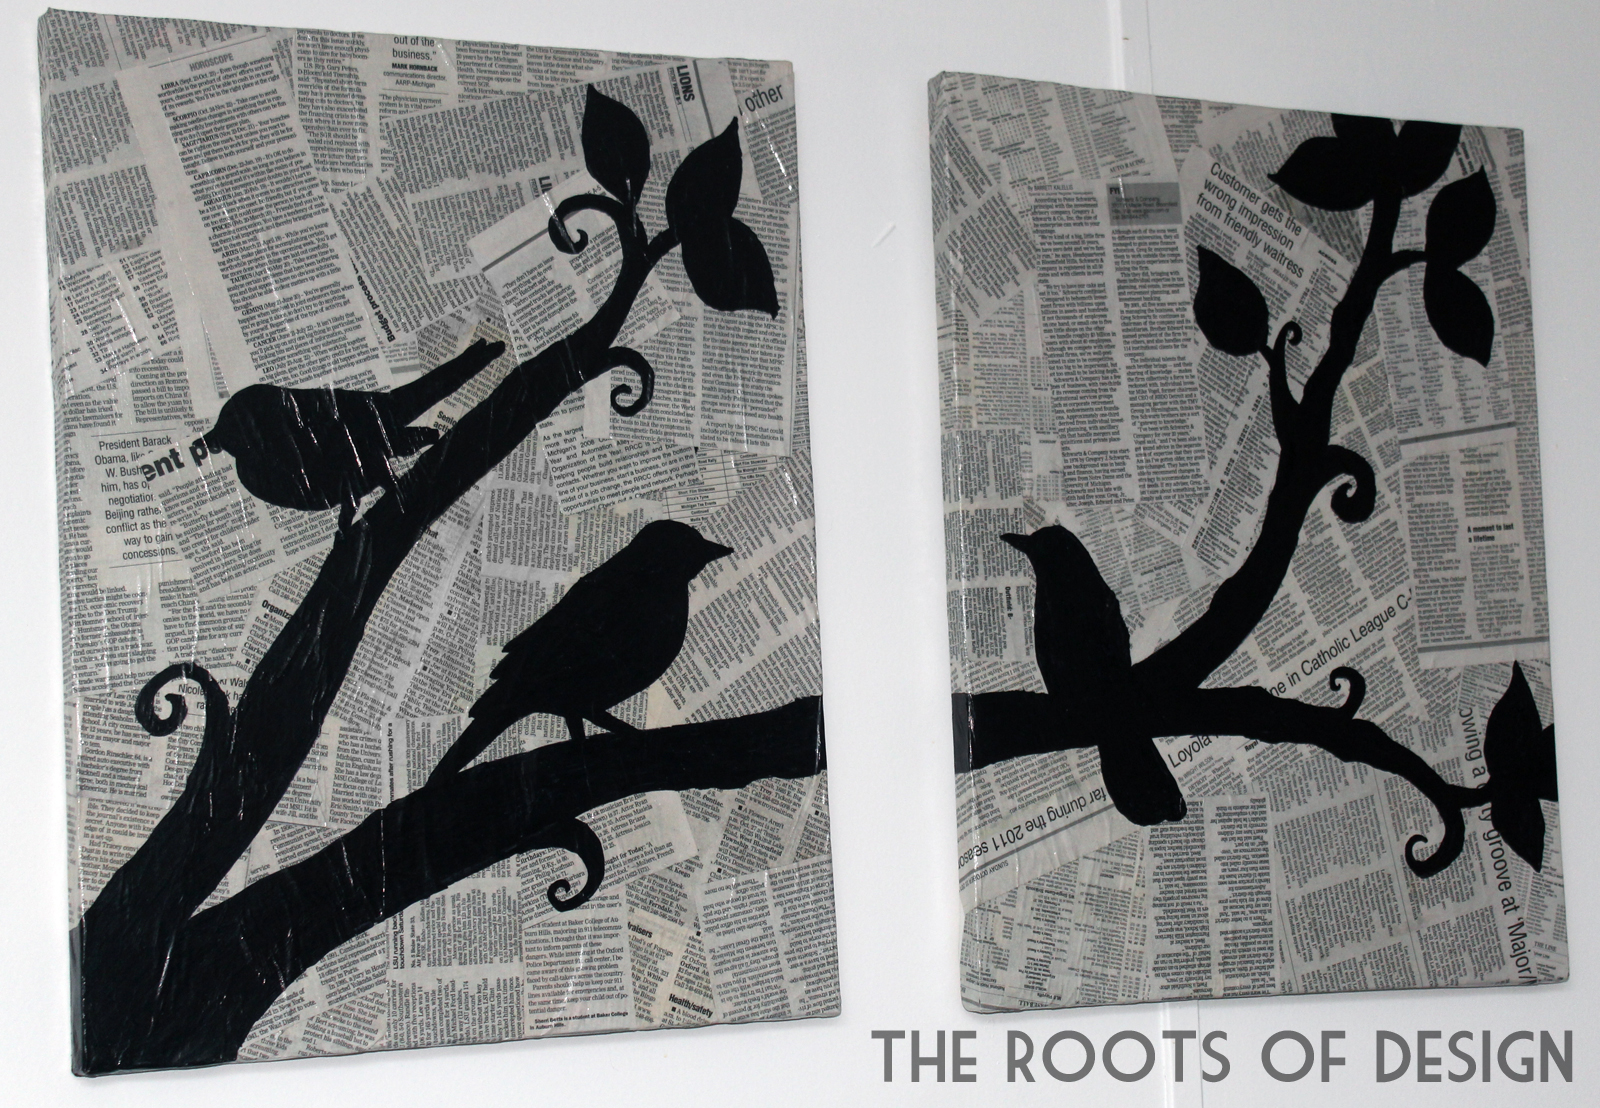
DIY Newspaper Art

Have I mentioned how addicted I am to Pinterest? I love it! There is so much inspiration there, I could spend hours on it.

When I saw this piece of art below I knew I had make one for myself.
source


It was really simple to do, but I did change a couple of things up, instead of using book pages, I used newspaper pages. With the newspaper I was looking for pages with lots of black and white all over it. Don't use anything with a color on the other side because it will leak through. I learned this the hard way.


Once I had all my newspaper I modge podged them onto my two canvases and let them dry over night.


Once it was dried I used pictures I printed out of real birds that I cut out to use as a stencil, just like the original one, and free hand the tree branches. I used a jumbo size and regular size sharpie for the design. If you mess up on something you can always add more newspaper and modge podge to that spot, but you will have to wait for it to dry before moving forward.


Overall I'm very pleased with the result and have this hanging in my bedroom now.


If you would like to see some of the other awesome things I have been pinning lately click here.


Monday, January 2, 2012

DIY Hula Hoops

I've been very interested in hula hooping for a long time. I used to be one of those people who could hula hoop nonstop. When I started seeing tutorials for handmade hula hoops, like the ones here and here, I got very interested. I knew that I really wanted to make some. So, for my first try I made some for my daughter, nieces, and nephews for Christmas. I made mine by combining the two previous tutorials I mentioned before and made a few changes.

First thing I had to do was to make a trip to my local hardware store for supplies.

You will need:
  • Irrigation piping/poly tubing
    • This is the stuff that is used for under ground sprinkler systems. I found this was a seasonal item in my area. This item was found in the garden center. This usually comes in 100 ft rolls. This tubing comes in different sizes of 80 psi - 160 psi. The larger the number the heavier the hoop. 80 psi was all that was left at the end of the season, when I went. This worked out okay for kids. Anyone older or if you want it as a workout hoop you will want it heavier. A big thing of piping is usually between $12-$20. You are going to want to clean the tubing when you get it home, mine was pretty dirty. I just used a basic cleaner. Also this will help the tape to stick better.
  • Insert-connectors 
    • Make sure they match the opening size of your tube. My tubing was 3/4" so I got 3/4" connectors.
  • Ratcheting PVC cutter 
    • This cost around $12 to $15 as well, but if you plan on making a lot of hoops this will make it easier on you. 
  • Colorful tape 
    • You can use duct tape, prism tape, and electrical tape. You will need to have electrical tape if you want to use duct tape or prism tape. This is because you will need to put the electrical tape around the edges of the prism tape or duct tape to make sure that those tapes stay put or they don't fray when you are using your hoop.
  • pot and boiling water
  • a knife
    Remember the below picture from this sneak peek post? These are all the supplies I picked up at Home Depot. I ended up ordering pink electrical tape and prism tape online. Now lets get to making that hula hoop.
Since I was just making this for kids I made each one 9 feet and 6 inches long. For an adult you would want to make them longer. For an adult they say you want the hoop to reach somewhere between your bellybutton and your shoulders. This is where I used my ratcheting PVC cutter to cut the tubing up.


All my connectors seem to have had these little tab things sticking out that was stopping me from pushing my hula hoop tubing completely together. You can see it in the below picture on the left side of the connector. You may or may not have this on yours.

I took a sharp knife and cut them off of all of mine. 


You will want to dip the ends of your tubing into boiling water. Putting heat onto the tubing allows the tubing to expand. This will make it easier to put the connectors into the tubing. You are only dipping the ends in for 15 to 20 seconds.

You will insert the connector into the side that you have heated up and then heat up the other side to put the connector into the other end. Once the tube cools down it will tighten onto the connectors. Make sure you push the tubing as close together as you can.


At this point I take a little bit of duct tape to help seal the hula hoop into place, where it is connected.

Now it is time for the fun part, tape!

 You will want to first start with either your prism tape or duct tape. You will want to angle the tape using your thumb as you are going to smooth out any creases. Quick note here, prism and electrical tape is a lot more forgiving then duct tape if you mess up, especially if the tape happens to stick together.

 After you have applied your prism tape or duct tape you will want to take your electical tape and wrap it around the edges of the prism or duct tape. You are doing this because the duct tape tends to goo up on its sides and the prism tape doesn't seem to stick as well after long periods of time. The electrical tape will keep it all in place and make it behave.

Once you have all the tape on, you are done. Enjoy and have fun. If you want your hoop to make noise you can put rice or dried beans into the tubing.

My daughter with her hula hoop on Christmas. She can hula hoop pretty fast with this.