Sunday, December 11, 2011

Elf Costume Revisted


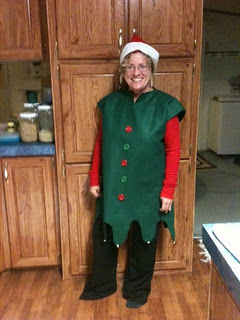
Do you remember a couple post back where I was talking about making your own elf costume? You can revisit it here. Well, someone found it and end up making one for herself. I just wanted to show off how well she did. She even added buttons to it. So cute.

Didn't she do a great job! Go check out her blog, Love Country Living, here

Saturday, December 10, 2011

Painting with Hair


One of the classes I took, this last term, was a drawing class. In this class my teacher wanted us to create art using an atypical media and tool. The first time I did it for the class I used blue Kool-aid and a toothpick. My teacher told me I wasn't being creative enough, so when she assigned doing an atypical media and tool art project again as part of my final I put my thinking cap on. As hard as I could I just couldn't think of anything that would be creative enough for my teacher, then thought was "Why don't you paint with your sister's hair?" I thought well that would be creative, but I didn't think my sister would go for it. My sister has very long hair that reaches her hips that she likes to dye black. I sent her a text to see what she would say and she said okay. I couldn't believe it! She went to the store and bought some red hair dye I could use to paint with. As payment for painting with her hair I have to help her bleach sections of it and put red stripes in it. To paint with my sister's hair she took a piece and braided it. I then would bend the braid in half or use the end of the hair paint with. All my sister had to do was sit close to me, she didn't even need to bend her head down because of how long her hair was. Now on with the pictures of me painting with my sister's hair below.

This is my sister with her really long hair. 


Once again the final project


Friday, December 2, 2011

Zentangle Love


I have this real love for zentangle. I been creating zentangle art since I was doodling in the margins of my notes in high school. The funny thing is I didn't know that this was really an art form or what it was called until a couple of months ago. I have renewed my love for zentangle again and now I can't seem to get enough of it. I'm even thinking of painting a part of my wall with its cool design, but for now let me show you some examples of my zentangle art.

This piece was done over a year ago in an art swap I was part of.


This is a newer zentangle piece I did a few weeks ago as part of a book cover I was designing.

Here is were I bring zentangle off the paper. This is a water bottle carrier that I decorated with sharpies. Sorry for the poor picture quality this was taken a long time ago by cell phone. 

This is my latest zentangle project painted onto a bowl about a week ago. I'm still waiting for it to get baked so I can get it back. When it is all done it will be black and white instead of gray and white.

Thursday, November 10, 2011

Sneak Peek

Yesterday, I went to hardware store and picked up the above items as part of Christmas gifts for my nieces and nephews. Right now I'm just waiting on a couple other items to come in the mail before I get started. Get ready to expect a new how-to soon.

Friday, November 4, 2011

A Very Nyan Cat Halloween


It seems as if Halloween was here and gone too fast. I had so many ideas and plans for Halloween that I just didn't get to this year, maybe next year. Regardless of time we had a great Halloween.

This year my daughter wanted to be the Nyan cat also known as the Pop-Tart Kitty. This took some thinking on my part to come up with a costume she could wear. There aren't that many out there, but I was able to come up with a costume that turned out pretty good and that she loved.


If you are not familiar with the Nyan cat you can watch a short video of it below. He doesn't do to much other then flies through the sky with a rainbow trailing him. My daughter saw him once and was hooked, so now everything is about the Nyan cat for her. There is even an app to play a Nyan cat game.

I wish I would of taken pictures of the process of me making the costume, but it wasn't too hard to make. It just took time. The materials I used were gray fleece, tan felt, pink felt, dark pink felt, ribbon in the color of the rainbow, and foam. The foam was one of those cheap foam pieces you put onto a bed. I found it was cheaper to buy that, then buying the foam from a craft store.

The pants, shirt, arm warmers, and hat I made from simple patterns, I already had. With the hat, I just added the ears to it. The Pop-Tart is just a basic rectangle shape, that consists of 6 pieces for each of the two Pop-Tart shapes. There is a front, a back, 2 sides, a top, and bottom pieces. There is one pink piece for the frosting and the sprinkles were just randomly cut and placed onto the frosting. The tail was made out of the gray fleece was attached to the back Pop-Tart along with the rainbow ribbons. To keep the Pop-Tart in place I put two gray strips near the inside top of the Pop-Tart so it could rest on the shoulders. Further down, inside the Pop-Tart, I added more gray fleece so it could be tied into place.


Here are some pictures of my little Nyan cat in action on Halloween night


The candy and spider rings that got given to the trick and treaters

We had our yearly spaghetti pumpkin
What is a spaghetti pumpkin you may be asking. Basically it is regular spaghetti cooked, and seasoned however you would normally cook it placed into a cleaned out pumpkin. It is then baked for about an hour at 350 degrees. I mix the different noodles we use to make it look even more interesting. Baking spaghetti in a pumpkin just adds to taste of the pasta and it is sooo good. My grandmother use to make a spaghetti pumpkin every year for Halloween and now I do.

This year our little dog even dressed up for the night. Too bad I can't get my cats to take part.

My daughter's score at the end of the night


Saturday, October 29, 2011

How to make an easy elf (or Peter Pan looking) costume

I have been seriously ignoring my blog and I'm very sorry about that. I'm going to try really hard not to do that anymore.

Today, one of m
y friends was asking how to make a simple Peter Pan costume. This made me think of the elf outfit I made for my daughter a few years ago. Since I made it, she has been wearing it almost every year. Yes, it is getting shorter, but last year she used it more as a shirt then a dress. Let's get back to my friend's question about the Peter Pan costume. When she asked about the Peter Pan costume it made me think how easy it would be to use the elf costume I made as a Peter Pan costume. So, today I will share with you how I made it, so you can make one too if you would like.


Materials needed:

  •  scissors
  •  thread
  •  needle or sewing machine (depending if you are doing it by hand or not)
  •  pins
  •  large piece of green fleece (1 to 2 yards depending on the size you are making it)
  •  small piece of brown or red fleece, enough to be used as a belt (the color you use will depend on if you will be using it as an elf costume or a Peter Pan costume)
  • small bells (optional) 
  • t-shirt or tank top to use as a pattern


Step 1

Take an oversize t-shirt or tank top that your child can wear. You will use this as your pattern. Pin the shirt to your material.  Make sure to leave plenty of room at the bottom. You will be cutting two pieces out, so it would be easiest if you fold your fabric in half before you pin. This way you can cut two pieces out at the same time.

Step 2
 
Cut around the shirt. If the shirt is more fitted you will can to cut it with more space around it. Somewhere between 1 to 2 inches more. If the shirt is baggier then you will want to cut it closer to the shirt.

If you are using a t-shirt you can tuck the sleeves into the shirt to make it easier to use as your pattern. This way the sleeves won't get in the way.

When you get to the bottom you will want to add some inches to it. I made it long enough to reach my daughter’s knees.

Step 3

Remove pins. At this point you should have 2 pieces like the above image.


Step 4

You will now want to take the bottom and cut triangle edges on both pieces like above image

Step 5 

Take the piece that you want to use as the front and cut the neckline down some. You are doing this so that the item can easlily be put over the head.

Step 6
  
Put the two pieces together and pin them together. Sew section a, b, c, and d (were the squiggly lines are) together.


Step 7

Turn the item the right side out. At this point if you are going to use it as a Peter Pan costume cut a strip of brown fleece and tie around as a belt. If you want it as part of an elf costume you can cut a strip of red fleece as a belt. You can also sew tiny bells at the bottom of each triangle edges. The picture on the above left is my daughter wearing the outfit a couple of years ago. The picture on the above right is what it looks like today with some missing bells off of it.


Notes

I like to use fleece for this project because you do not have to worry about the edges fraying, but you can use any type of material you would like.


Wednesday, April 6, 2011

Cake Decorating

Last weekend I took all my Girl Scouts to a cake supply store. All my girls got to decorate mini cakes. If you have ever seen Cake Boss on TV it was like they were all mini cake bosses. They all got to wear little aprons and got to learn how to ice and decorate a two layer cake. They even gave the girls fondant so they could put some really cool looking items on their cake. Fondant works like play dough, but it is edible. Most of the girls made flowers or butterflies out of it, but my daughter and her friend decided to make SpongeBob and Patrick out of it. It was a really fun day and all the girls loved it.

Here are some pictures for your viewing enjoyment.